
When customer issues stack up and response times drag, it's easy for small support teams to feel overwhelmed. Tickets get lost, urgent requests go unanswered, and customers grow frustrated.
HubSpot's help desk is built with tools that can fix these problems if you set it up the right way.
Let’s talk about how to configure HubSpot's help desk so your team can resolve tickets faster. You'll learn how to set up automation, create smart routing rules, organize your workspace with views and spaces, and use reporting to track what's working and what's not.
Why Help Desk Configuration Matters

A help desk is only as good as how it's set up. Without the right structure, tickets can sit unassigned, response times can slip, and your team can waste time on manual tasks that should be automated.
When you take time to configure your help desk properly, you give your team a clear system for managing requests. That means faster responses, fewer mistakes, and happier customers.
Customer service teams using AI have reduced call time by 45% and resolved issues 44% faster, showing how the right tools and configuration can save time and improve results.
The goal is to create a workflow where tickets move smoothly from open to closed without getting stuck in the middle.
How Do I Set Up Help Desk in HubSpot?
Setting up HubSpot’s Help Desk starts with connecting your channels and organizing your team. Here's how to get the basics in place so you're ready to handle customer requests right away:
Step 1: Connect Your Support Channels
The first thing you need to do is connect the channels customers use to reach you. You can connect chat, email, form, calling, and Facebook Messenger channels to the help desk tool. Doing so ensures every customer request turns into a ticket automatically.
For example, if you connect a team email address like support@yourcompany.com, every email sent to that address will create a ticket in the help desk. The same goes for form submissions, live chat conversations, and even calls if you have Service Hub Professional or Enterprise.
Connecting all support channels to the help desk lets your team manage everything from one place. If you don't connect a channel, tickets created from that source might be missing important details like the subject line or conversation thread.
90% of customers expect a consistent experience across all channels, including online, mobile, and in-person interactions. When you centralize all channels in one help desk, you make it easier to deliver that consistency.
Step 2: Organize Your Team

Once your channels are connected, you need to organize your team so that tickets get routed to the right people. It's recommended that you organize team members into HubSpot teams based on expertise and how you plan to share tickets.
For example, if you have a general support team and a technical support team, create two HubSpot teams and assign the right users to each. This makes it easier to route tickets by issue type.
You can also assign skills to users, like language fluency or product expertise. This helps route tickets to the rep best equipped to resolve the issue.
Step 3: Set Up Working Hours and Availability
Your team can't answer tickets 24/7, so it's important to set working hours for each user. Super Admins and individual users can set weekly working hours based on a user's timezone.
When a user is outside their working hours, their availability will be changed to Away, and they will not be eligible for automatic assignment.
This keeps tickets from being assigned to people who aren't available to respond. You can also manually change your availability status during the day to reflect when you are Away, which is helpful if someone steps out for lunch or needs to focus on a project.
Can HubSpot Help Desk Reduce Ticket Resolution Time?
Yes, and the key is using automation and routing to reduce manual work. When tickets are automatically assigned to the right person and workflows handle repetitive tasks, your team can focus on solving problems instead of managing logistics.
Automate Ticket Assignment
One of the fastest ways to reduce resolution time is to set routing rules to automatically route incoming emails to specific users and teams in your account.
Instead of leaving tickets unassigned and waiting for someone to grab them, HubSpot can route them based on factors like:
- Team membership: Send billing questions to the finance team and technical issues to product support.
- Skills: Route tickets to reps who speak the customer's language or have expertise in a specific area.
- Availability: Only assign tickets to reps who are online and within their working hours.
For example, if a customer submits a form asking about a refund, you can set a rule to automatically assign that ticket to someone on the billing team. This cuts down on response time because the right person sees the ticket right away.
Set Ticket Capacity Limits
Super admins can set ticket capacity limits for users managing tickets in the help desk. This makes sure no one gets overwhelmed while others sit idle. When limits are reached, automatic ticket assignment will pause, so tickets are distributed more evenly across the team.
For example, if you set a limit of 10 open tickets per rep, HubSpot will stop assigning new tickets to someone once they hit that number. This prevents burnout and keeps the workload balanced.
Use SLA Goals to Track Response Times
You can set service level agreement (SLA) goals to help your support team stay on track with customer expectations by defining goals for ticket response and resolution times. SLAs can be set for metrics like:
- Time to first reply: How quickly a customer gets an initial response.
- Time to next reply: How long before you send follow-up messages.
- Time to close: How long it takes to fully resolve a ticket.
You can also set when a ticket's SLA status will change to Due soon so your team gets a reminder before missing a deadline. SLAs create accountability and help you identify where response times are slipping.
72% of customers expect a response within 30 minutes of reaching out, making first response time a critical factor for customer satisfaction. Setting clear SLA goals helps your team meet these expectations consistently.
What Features Improve Help Desk Speed in HubSpot?
HubSpot's help desk includes several features designed to speed up ticket resolution. Here are the most important ones and how to use them:
1. Views and Filters
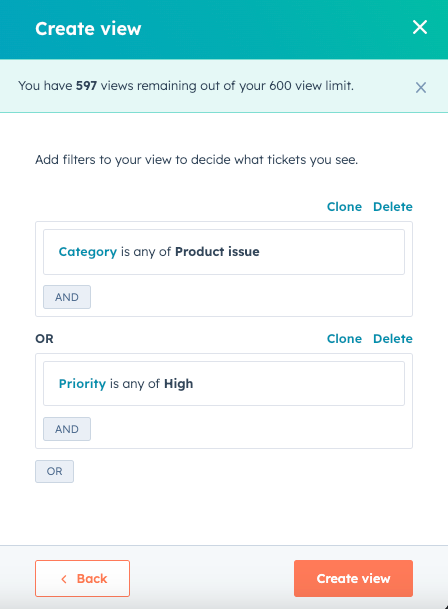
Views let you and your team organize the help desk workspace according to each member's specific needs. HubSpot includes default views like Unassigned, Assigned to me, and All Open, but you can also create custom views to filter tickets by priority, status, or any other property.
For example, you could create a view that shows only high-priority tickets that are due today. This helps your team focus on what matters most without getting distracted by lower-priority requests.
Custom views can be private, shared with a team, or made visible to everyone. This flexibility lets each rep organize their work in a way that makes sense for them.
2. Help Desk Spaces
Spaces are dedicated, team-based areas that streamline ticket management, reduce clutter, and promote focus for your support teams. If you have multiple support teams handling different types of issues, Spaces keep everything organized.
For example, you might create one space for your general support team and another for your technical support team. Only tickets assigned to the main team members within a space will be visible, so reps only see the tickets they're responsible for.
Spaces work especially well for larger teams that need to keep work separated without adding complexity.
3. Automation Workflows
Automation reduces repetitive tasks and keeps tickets moving forward. You can set up workflows to:
- Send automatic replies when a ticket is created.
- Escalate tickets that haven't been answered within a certain timeframe.
- Close tickets automatically if the customer hasn't responded after a set number of days.
- Route tickets based on keywords in the subject line or description.
For example, if a ticket sits unanswered for 24 hours, a workflow can send a reminder to the assigned rep or escalate it to a manager. These small automations add up and prevent tickets from stalling.
4. Sidebar Customization
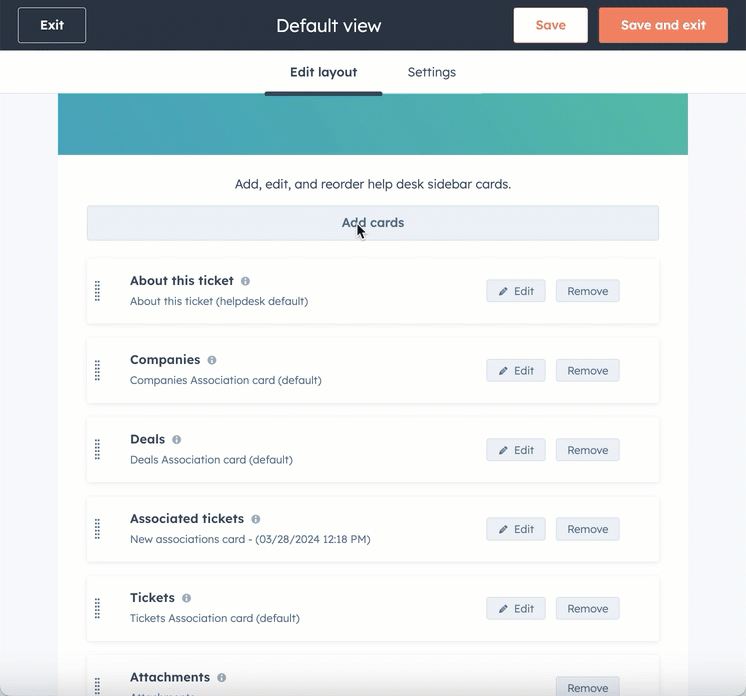
Super admins can configure how ticket information appears in the right sidebar of the help desk tool. This lets you surface the most important customer details right where your reps need them.
For example, you can add cards that show recent orders, past tickets, or custom properties like account type or renewal date. You can add a card to the preview sidebar and even set conditional display logic so certain cards only appear when relevant.
This gives reps all the context they need without having to click through multiple records.
5. Reporting and Dashboards
Use the custom report builder to generate reports that provide valuable insights into SLA performance, improving efficiency and customer satisfaction. You can track metrics like:
- Average response time
- Average resolution time
- Ticket volume by channel
- Customer satisfaction scores
These reports help you spot patterns, like which issues take the longest to resolve or when ticket volume spikes. Over time, this data guides you toward smarter decisions about staffing, training, and process improvements.
How Do I Automate Ticket Routing in Service Hub?
Automating ticket routing is one of the most effective ways to speed up resolution times. Here's how to set it up step by step:
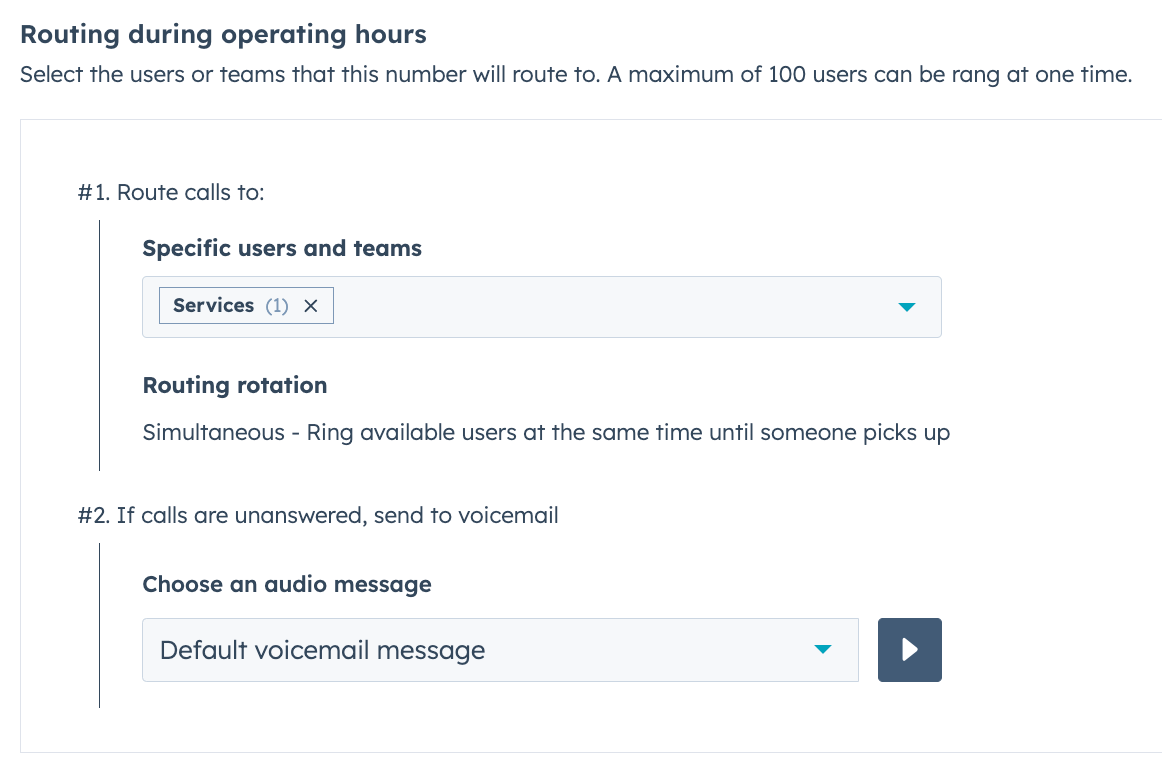
1. Set Up Routing Rules Based on Ticket Properties
Super Admins and users with Account access permissions can create routing rules for each channel connected to the help desk. Routing rules let you automatically assign tickets based on conditions you define.
For example, you can create a rule that says:
- If the ticket priority is High, assign it to the senior support team.
- If the ticket pipeline is Billing, assign it to the finance team.
- If the ticket source is Chat, assign it to the team with the shortest response time.
These routing rules will execute sequentially: if the conditions of the first rule are not met, the second rule will be tried, and this process will be repeated until all the rules are tried. This lets you build a smart routing system that handles different types of tickets in different ways.
2. Use Skill-Based Routing
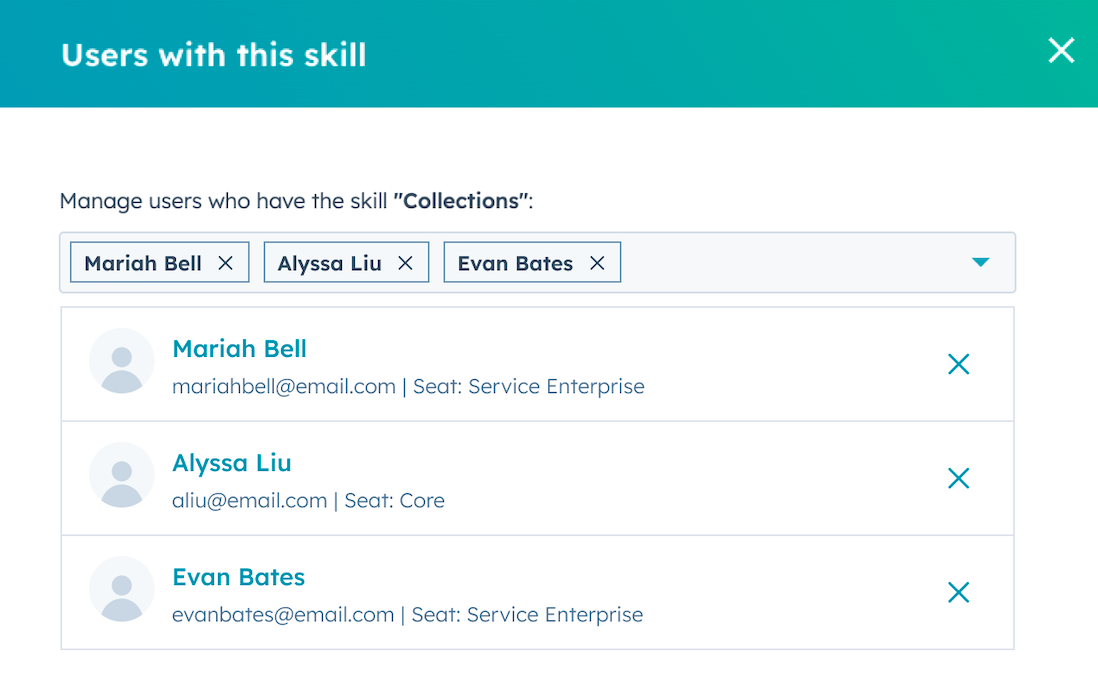
You can create skills for your account's users and then route help desk tickets to users based on their skills. Skills can include things like language fluency, product knowledge, or specialization in a part of your business.
For example, if a customer submits a ticket in Spanish, you can route it to a rep who has Spanish listed as a main or secondary language. This makes sure customers get help from someone who can communicate clearly and solve their problem faster.
To set this up, you can create and manage skills in your account and then associate a skill with a user on their profile.
3. Set Ticket Assignment to Available Users Only
By default, incoming conversations will only be assigned to agents who are available. This prevents tickets from being assigned to reps who are offline or away from their desk.
If you want to change this, you can clear the "Assign to available users only" checkbox, but it's usually better to leave it on. That way, tickets only go to people who can respond right away.
4. Monitor and Adjust Routing Performance
You can analyze the performance of your rulesets by reviewing key metrics such as the number and percentage of tickets that matched specific routing rules. This helps you see whether your rules are working as expected or if tickets are falling through the cracks.
For example, if a large percentage of tickets are hitting the default routing rule, it might mean your conditions are too narrow or need to be adjusted. Regular monitoring helps you fine-tune your routing over time.
From Chaos to Speed
A well-configured help desk is the difference between a support team that's constantly playing catch-up and one that stays ahead of customer needs.
Through automation, routing rules, views, and reporting, you give your team the structure they need to resolve tickets faster and deliver better service.
HubSpot's help desk is built with these tools in mind, so you can start with the basics and scale up as your team grows. The key is to take it step by step, monitor your results, and adjust as you learn what works best for your business.
When your help desk is set up right, customers get faster responses, your team feels less stressed, and you build the kind of service experience that keeps people coming back.
Get Expert Help Configuring Your Help Desk
Origin 63 helps businesses set up HubSpot Service Hub so it works the way your team needs it to. We'll configure routing, automation, and reporting so your support team can resolve tickets faster and deliver better customer experiences.
Talk to Origin 63 today to get started.


.png?width=90&height=90&name=Arrows%20Partner%20Badge-test%20(1).png)

